

I picked all of the beets that were big enough to can, and it sure seemed like I had a lot. But after I got them all packed into jars, I realized that I only had 2 quarts. There are still more to pick, but they're still small yet. I think I posted directions for pickling beets before (1 part sugar to 1 part vinegar with cinnamon to taste), but I actually canned this batch. Leave a 1/2" of headspace to allow for expansion and process in a water bath canner for 30 minutes. I kept mine whole (just like my grandparents used to), except for the few that were just too big to can whole.
I also trimmed up my rosemary plant today. It was a Christmas gift, and it's been growing nicely in a pot in my windowsill. I'm hoping the trimming will encourage new growth, but the pot might simply be restricting the roots too much (it will obviously never get as big as it could outside in the ground as long as it stays in the pot). I might have to transplant it soon.
Artichokes were getting out of hand at the farm, and nobody was eating them. I decided to make an artichoke pesto. I had over 20 artichokes, but most of them were small. They were starting to open up, and once they bloom they're not much good for eating. I boiled the artichokes for 40 minutes in two batches and then put the artichoke hearts in a blender with the rosemary I'd trimmed off, about 10 cloves of garlic, some lemon juice, a bit of sea salt, a good helping of of olive oil, and almonds (the only nuts I had on hand). It smells and tastes great (the bit I sampled at least). I had a great artichoke pesto with sun-dried tomatoes at Veganopolis, in Portland... and I really wish I had sun-dried tomatoes for mine. It's still good though, and I'm looking forward to having some on pasta or a sandwhich/wrap. Tonight's dinner was artichoke petals, and more than I knew what to do with.
I think I mentioned that I was going to be doing (or, at least see about doing) some gardening out at my grandfather's house. I used Google Earth to estimate that the gardening area is between 7 and 8,000 sq. ft. The sprinkler I'm planning on getting has a range of just under 4,000 sq. ft. at the maximum PSI. And oscillating sprinklers have the best range, though at the expense of watering efficiency. The biggest problems with oscillating sprinklers is that the water can be carried away by the wind because it's being spraying higher in the air than with other types of sprinklers, and for the same reason, more of it is likely to be evaporated. Watering early in the morning should help me alleviate both of these problems.
As best as I can tell, the 4,000 sq. ft. that this sprinkler will cover is already larger than the area that my grandfather used to plant in, so it sounds like a good start to me. And, I won't be out at my grandfather's house daily, so I need something that will cover a large area without needing to be moved around (or without the need to purchase more than one). With an automatic timer I can set the sprinkler to run every morning, whether I'm there or not. That way I know my plants are getting the water they need. Outside of this 4,000 sq. ft. area I'll plant drought resistant plants, or plants with lower watering requirements... probably perennials like fruit trees (although, fruit trees will require more water during the first year or two as they get established).
This is all theoretical of course, especially since I don't really have a way to get to my grandfather's without catching a ride. He's way out in the country, I don't drive, and I'm currently bike-less. But these are only minor obstacles. I should have a clover crop sown in August, and I'll till it in in the spring and get started on planting a real garden.
Thursday, July 10, 2008
Wednesday, July 09, 2008
I've been really excited about espalier fruit trees ever since I read about them in John Seymour's The Self-sufficient Life and How to Live It. My interest was renewed when I was sitting at the farmers' market today next to a guy that was selling apple trees, among other things. I'm thinking about putting down a cover crop at my grandfather's place to start getting the soil ready for next season, since the soil is in really bad shape. Planting some fruit trees while I'm at it doesn't sound like a bad plan either.
 (Photo by sillydog)
I don't have any experience with espaliering fruit trees, and reading really doesn't cut for some of the more visual gardening practices. Fortunately, I found this great video that takes you through the process step-by-step. The guy's a little goofy, but it's a well-made video. Hope you enjoy it as much as I did.
Monday, July 07, 2008
After a short hiatus, I'm back! It seems one of my firefox extensions was messing with the Blogger layout, and it was making it difficult to blog. I finally weeded it out this morning though (and that was far from the last thing I weeded).
But first thing's first: the maraschino cherries are done! I provided a link to the recipe at the end of the last post. It's a 3-day process, but most of that is just waiting. After the initial soak, you boil them once each day, and on the final day you can them in a water bath canner. Mine turned out great! I've got six pints with a few left over that wouldn't fit in my jars. Those are sitting in my fridge, slowly being devoured.
The cantaloupe row is doing awesome. That garden claw really did the trick. There were weeds coming up, but they came out easily. It only took about 5 minutes to weed the entire 100 ft. row. I started working on the cucumber row with the garden claw. Hopefully we'll have mulch soon.
Today I ended up with raspberries. It's still a little early, but I should have enough to freeze a quart-sized bag full. They'll make awesome breakfast smoothies when I'm running out the door to class.
I'll write more when I have the energy... which definitely isn't today.
Wednesday, July 02, 2008
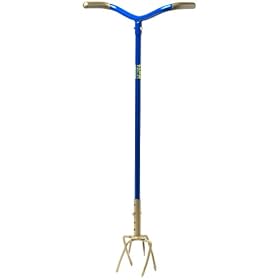
Back when I watched TV, I used to see infomercials for these things all the time. The Garden Claw, that is. We have a few of them sitting around at the farm (underused, if I may say so myself), so I decided to give one a try.
We have an unmanaged hill to the west of the gardens, and the grass, horsetails, and 4-foot-tall thistles rain down an unholy mess on my lovely row of cantaloupe, which happen to be right next to the hill. It's an organic farm, which I appreciate... but the weeds get so out of control, especially in this row. It took two of us about two hours to weed it earlier this week. Short of dropping napalm on the hill, I was determined to get the weeds under control in this row. That's where the Garden Claw came in.
My plan was two-fold. I wanted to get up any of the roots that had managed to escape us during the weeding process, and I wanted to make it more difficult for weeds to get started (or, at least easier to pull up once they did start). My other option, aside from the Garden Claw, was a broad fork (a wide pitchfork-like tool with two handles used for breaking up compacted soil), but that wouldn't allow me to maneuver around the cantaloupe.
The Garden Claw worked surprisingly well, just press it into the ground and give it a twist to break up the soil in a 8-12" radius. It took me about an hour and a half to do the entire 100 ft. row, down one side and back, which is less time than it took to weed the bed. Of course, this is the first time this season that I really had to use my hands to do some hard work, so I got a bit of a blister on my palm. It's small and painless and will likely be gone in the morning, but if your hands aren't used to the work, I suggest you take it easy.
The only thing I really have to compare the Garden Claw to is a broad fork and a rototiller. The Garden Claw definitely does a better job of breaking up the soil than either of them, but it's at the expense time and energy. But, if you've already got plants planted, it's great for working around them, and it doesn't use any gas, which is a plus in my book.
In other news, today was a busy day at the farmers' market. I work at the information booth for the non-profit that organizes the market, and I run credit, debit, and food stamp purchases for the entire market. Today I bought nearly 5 pounds of cherries from one of the vendors, and I'm planning on making maraschino cherries. I'll go buy a cherry pitter tomorrow so I can get started on it. I've never made them before, but it's one of the recipes I got from the extension office website. I'll let you know how they turn out.
Tuesday, July 01, 2008
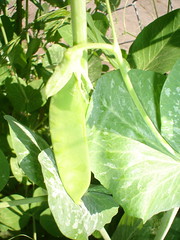
So, it's that time of year again, time for snow peas and clichés like "it's that time of year again."And I don't just mean a few snow peas. I'm talking about 2 hundred-foot rows of snow peas. I picked nearly a full 5 gallon bucket of the little suckers last week and then was informed that the second row was getting tilled up. The peas had shared the bed with radishes and 2 foot tall thistles, and they just weren't doing as well as the other row. So, I had the pleasure of pulling up the entire row and picking all of the peas off. Luckily for me this row wasn't doing as well, otherwise I would have had more peas than I knew what to do with.
It took me several hours to get these bad boys cleaned up and packed away in the freezer all by myself, but it'll be worth it when the school year rolls around and I have lots of yummy organic peas to eat.
The first thing you have to do is get them nice and clean. I dumped them all in my sink and ran the sink full of cold water. On my counter I set out my cutting board and a small paring knife with some large bowls to the left of the cutting board. I gave the peas a little scrub and placed them on the counter on the opposite side of the cutting board from where I'd be sitting. You might want to lay down some towels, otherwise you'll get a good puddle going (I just mopped it up after I was done). Once I got a good pile I sat at my cutting board and started trimming the ends off and tossing the pea pods in the bowls. After you master this fine art, you'll find that you can cut the ends off of two or three peas at a time. And remember, this is for sugar snap or snow peas only! The pods on other peas aren't edible, so you'll have to shell them.
When you've got all of your peas trimmed up get a big pot of water boiling on the stove. You'll need to blanch the pea pods for 2-3 minutes. A blanching basket would be nice, but I'm poor so I just removed the peas from the boiling water with a slotted spoon and plunged them into a sink full of ice cold water. This stops the cooking process.
After they're good and cool, just let them drain. I usually put a colander inside a large bowl and let the peas sit inside there for a while. From there, pack them into gallon freezer bags and load them into the freezer. I have five bags full and they're taking up most of my freezer and a portion of the community freezer in the res hall. Oh well, it's summer so nobody else is here.
If you find any good recipes, send them my way. I usually make soups or stir-fry with mine. This mint and pea soup is looking really good, but I'd have to substitute for the dairy.

(Have you noticed that I've been using a bunch of Flickr photos? My camera finally died after surviving several years of my abuse, including all of those backpacking trips. R.I.P.)
