Showing posts with label gardening. Show all posts

Friday, March 12, 2010

One of the biggest challenges I face when trying to "convert" people to forest gardening is an unwillingness to give up our favorite annuals--tomatoes, zucchini, potatoes, carrots, etc. In fact, forest gardens are very heavy on fruit trees and nuts, followed closely by berries. Littered across the food forest floor is a smattering of this green and that.


It's a system built on shade.

Our lovable annuals are sun-hungry.

Well, I have four tentative solutions for this sticky situation.

The first is to grow your annuals at the edge of your forest garden. This is my least favorite solution as it requires me to give up valuable space I could be using to grow the more productive fruit trees and bushes. Still, there might be some merit to training vining vegetables like peas and beans up the trees at your gardens edge. If one has to give up valuable garden space, I suggest sticking to productive and multi-layered companion plantings like three sisters.

The second solution is to grow your annuals in the sky. No, I'm not talking about magic. I'm talking about upside down planters like the Topsy Turvies I used in my indoor garden. These could be attached to the sturdy branches of larger trees, or, lacking such trees, could be attached to a building or temporary fixture. A simple bamboo tripod comes to mind.

This technique has the advantage of adding another layer to the forest garden: plants that start at the top and grow down. Granted, you'll want to be careful where and how you're planting your upside down planters as leafy trees can block the sun and cause your tomatoes or other annuals to die. But, a well positioned planter can give you annuals and keep your forest garden a no-dig zone.

The third option is to focus on winter crops. Broccoli and other brassicas, root crops, and many greens can be over-wintered... depending on how harsh your winters are and how well you take care of them. This means they're better suited to low light conditions and can thrive when the trees lose their leaves in the fall. They'll certainly grow slower and may never develop to the extent that they would in a sunny monocultural garden bed. But, they should develop nonetheless.

The fourth option is to find alternative crops. It might seems like forest gardens are all fruits and nuts, but their not. Lots of edible greens can be grown in a forest environment. Ostrich ferns can be grown in dappled shade and their fresh young shoots can be harvested at the beginning of spring and used like asparagus. Bamboo shoots are another good pick. Cow parsnip can be used as an alternative to rutabaga. Hog peanut serves as an alternative to true peanuts. Wild cucumber (Streptopus amplexifolius, there is also a plant called wild cucumber which is poisonous) can be a substitute for... you guessed it: cucumber (in terms of flavor, at least... it doesn't look like anything you'd ever call cucumber).

My entire list of shade-loving perennial edibles can be found here. I'm still working on the much longer list of of plants that thrive in dappled shade and hope to have that up sometime before the end of the world.

Until then, hopefully these solutions inspire you to jump into forest gardening whole-heartedly. You won't regret it.
Comments

Thursday, January 14, 2010

I told you I would do it. A follow up to my quick blurb about shade loving plants. I spent the last 2 1/2 hours compiling this list of shade-loving perennials from the Plants for a Future database. The plants have the following qualities: perennial (don't need replanting year after year), survive in "deep shade," and have an edibility score of 1 or more. PFAF gives plants an edibility score from 0-5, 0 being not edible and 5 being very edible. The following plants have at least some edible part (leaf, root, tuber, fruit, shoots, etc.), but they may need to be cooked or prepared in a certain way. Some of these plants may have poisonous parts, or be poisonous when consumed raw. As always, do your own research and consult an expert when in doubt. Also, be warned that many plants go by the same common names, and while some may be edible, others may be poisonous. Always use scientific names when matching plants.

I looked over the descriptions briefly as I compiled this list, and the Tsi (which I already mentioned) and the Wall Lettuce both look promising as year round greens, where they will grow.

The benefit of shade loving and shade tolerant plants is that they can be grown under fruit and nut trees (have you ever driven by an orchard to see nothing but dirt or weeds underneath the trees). But orchards aren't the only ones that suffer from that; just look at traditional gardens: corn, carrots, etc. have to be evenly spaced to ensure proper lighting and watering.

Shade grown plants can be a great source of leafy greens, as well as carb-rich tubers and roots. As an extra bonus, many shade loving plants work well as winter crops (either being harvested specifically in the winter, or being harvestable year round).

Some of these plants may not have high yields. Some of them might not even taste good. I recommend tasting anything you intend to plant before you plant it to make sure it's worth the time and energy you have to put in, or the space it will take up (that's the thing with a perennial garden: things are intended to be permanent, and it's not a question of simply not planting the things you don't like next year).

Before jumping straight into the list, I wanted to suggest some books on the topic of shade gardening: Taylor's 50 Best Perennials for Shade, Making the Most of Shade, Taylor's Guide to Shade Gardening, and The Complete Shade Gardener. I haven't read them yet, but they've received good reviews and are on my "to read" list. They might not have a lot of information on edibles (I won't know until I pour over them), but they're likely to have helpful information about shade gardening technique. If you have read them, let me know what you think in the comments. Also, if you have grown or eaten any of the plants listed below, feel free to provide any information you have on yields, harvesting, preparing, taste, etc. The more information we have, the better.

Without further ado...

Shade-loving perennial edibles

Alphabetical by common name

Arctic Sweet Coltsfoot - Petasites hyperboreus
Arrowleaf Sweet Coltsfoot - Petasites saggitatus
August Lily - Hosta plantaginae
Bellwort - Uvularia perfoliata
Bellwort - Uvularia sessilifolia
Beth Root - Trillium erectum
Bluebeard - Clintonia borealis
Broom Rape - Orobanche ludoviciana
Bugle - Ajuga reptans
Bur Reed - Sparganium erectum
Butterbur - Petasites albus
California Broomrape - Orobanche californica
Canada Beadruby - Maianthemum canadense
Cancer Root - Orobanche fasciculata
Cao Yu Mei - Anemone rivularis
Couch Grass - Elytrigia repens
Cow Parsnip - Heracleum sphondylium montanum
Crinkleroot - Dentaria diphylla
Cuckoo Pint - Arum maculatum
Fairybells - Disporum trachycarpum
Fairyslipper - Calypso bulbosa
False Spikenard - Smilacena racemosa
Friar's Cowl - Arisarum vulgare
Ginseng - Panax ginseng
Greater Celandine - Chelidonium majus
Green-Dragon - Arisaema dracontium
Ground Cone - Orobanche tuberosa
Ground Elder - Aegopodium podagraria
Ground Nut - Panax trifolius
Hairy Solomon's Seal - Polygonatum pubescens
Herb Paris - Paris polyphylla
Himalayan May Apple - Podophyllum hexandrum
Hog Peanut - Amphicarpaea pitcheri
Huang Jing - Polygonatum sibiricum
Indian Hemp - Apocynum cannabinum
Indian Pipe - Monotropa uniflora
Indian Turnip - Arisaema quinatum
Jack In The Pulpit - Arisaema triphyllum
Japanese Ginseng - Panax japonicus
Jerusalem Sage - Pulmonaria saccharata
King Solomon's Seal - Polygonatum commutatum
Labrador Violet - Viola labradorica
Large Campanula - Campanula latifolia
Lily Of The Valley - Convallaria keiskei
Lily Of The Valley - Convallaria majalis
Lungwort - Pulmonaria officinalis
Manchurian Spikenard - Aralia continentalis
Mitsuba - Cryptotaenia japonica
Orpine - Sedum telephium
Oxlip - Primula elatior
Painted Trillium - Trillium undulatum
Papoose Root - Caulophyllum robustum
Papoose Root - Caulophyllum thalictroides
Redwood Sorrel - Oxalis oregana
Rue-Anemone - Anemonella thalictroides
Sailor-Caps - Dodecatheon hendersonii
Sakhalin Spikenard - Aralia schmidtii
San Qi - Panax pseudoginseng notoginseng
Scootberry - Streptopus roseus
Siberian Tea - Bergenia crassifolia
Sidebells Wintergreen - Orthilia secunda
Single Delight - Moneses uniflora
Small Solomon's Seal - Polygonatum biflorum
Snake Root - Asarum canadense
Solomon's Seal - Polygonatum multiflorum
Solomon's Seal - Polygonatum odoratum
Speckled Wood Lily - Clintonia umbellulata
Squirrel Corn - Dicentra canadensis
Star-Flowered Lily Of The Valley - Smilacena stellata
Sweet Butterbur - Petasites palmatus
Sweet Coltsfoot - Petasites frigidus
Sweet Coltsfoot - Petasites japonicus
Sweet Woodruff - Galium odoratum
Tian Nan Xing - Arisaema amurense
Tien Ma - Gastrodia elata
Toadshade - Trillium sessile
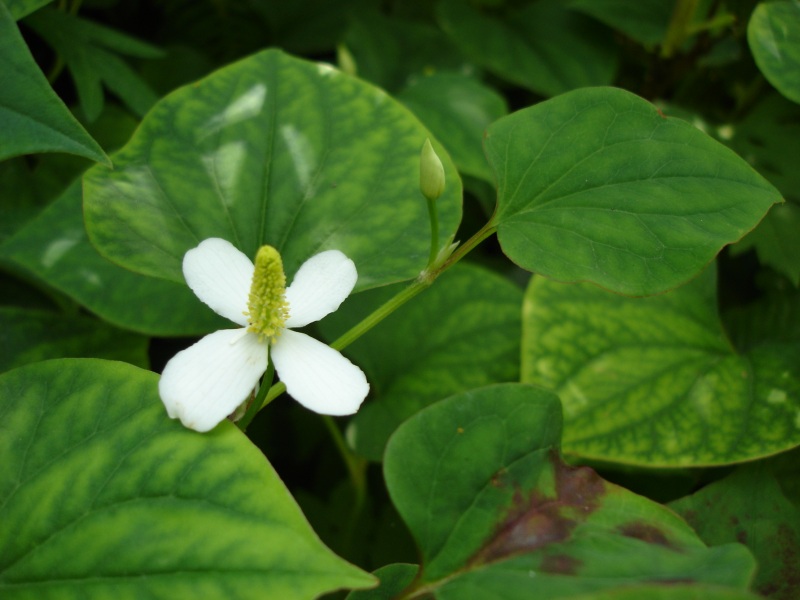
Tsi - Houttuynia cordata
Udo - Aralia cordata
Wakerobin - Trillium ovatum
Wall Lettuce - Mycelis muralis
White Trillium - Trillium grandiflorum
Whorled Solomon's Seal - Polygonatum verticillatum
Wild Cucumber - Streptopus amplexifolius
Wild Ginger - Asarum caudatum
Wild Lily Of The Valley - Maianthemum dilatatum
Wild Sarsaparilla - Aralia nudicaulis
Wintergreen - Pyrola minor
Wood Millet - Milium effusum
Wood Sorrel - Oxalis acetosella
Yellow Archangel - Lamium galeobdolon
Youth On Age - Tolmiea menziesii


Alphabetical by scientific name

Aegopodium podagraria - Ground Elder
Ajuga reptans - Bugle
Amphicarpaea pitcheri - Hog Peanut
Anemone rivularis - Cao Yu Mei
Anemonella thalictroides - Rue-Anemone
Apocynum cannabinum - Indian Hemp
Aralia continentalis - Manchurian Spikenard
Aralia cordata - Udo
Aralia nudicaulis - Wild Sarsaparilla
Aralia racemosa - American Spikenard
Aralia schmidtii - Sakhalin Spikenard
Arisaema amurense - Tian Nan Xing
Arisaema dracontium - Green-Dragon
Arisaema quinatum - Indian Turnip
Arisaema triphyllum - Jack In The Pulpit
Arisarum vulgare - Friar's Cowl
Arum maculatum - Cuckoo Pint
Asarum canadense - Snake Root
Asarum caudatum - Wild Ginger
Bergenia crassifolia - Siberian Tea
Calypso bulbosa - Fairyslipper
Campanula latifolia - Large Campanula
Caulophyllum robustum - Papoose Root
Caulophyllum thalictroides - Papoose Root
Chelidonium majus - Greater Celandine
Clintonia borealis - Bluebeard
Clintonia umbellulata - Speckled Wood Lily
Convallaria keiskei - Lily Of The Valley
Convallaria majalis - Lily Of The Valley
Cryptotaenia japonica - Mitsuba
Dentaria diphylla - Crinkleroot
Dicentra canadensis - Squirrel Corn
Disporum trachycarpum - Fairybells
Dodecatheon hendersonii - Sailor-Caps
Elytrigia repens - Couch Grass
Galium odoratum - Sweet Woodruff
Gastrodia elata - Tien Ma
Heracleum sphondylium montanum - Cow Parsnip
Hosta plantaginae - August Lily
Houttuynia cordata - Tsi
Lamium galeobdolon - Yellow Archangel
Maianthemum canadense - Canada Beadruby
Maianthemum dilatatum - Wild Lily Of The Valley
Milium effusum - Wood Millet
Moneses uniflora - Single Delight
Monotropa uniflora - Indian Pipe
Mycelis muralis - Wall Lettuce
Orobanche californica - California Broomrape
Orobanche fasciculata - Cancer Root
Orobanche ludoviciana - Broom Rape
Orobanche tuberosa - Ground Cone
Orthilia secunda - Sidebells Wintergreen
Oxalis acetosella - Wood Sorrel
Oxalis oregana - Redwood Sorrel
Panax ginseng - Ginseng
Panax japonicus - Japanese Ginseng
Panax pseudoginseng notoginseng - San Qi
Panax quinquefolius - American Ginseng
Panax trifolius - Ground Nut
Paris polyphylla - Herb Paris
Petasites albus - Butterbur
Petasites frigidus - Sweet Coltsfoot
Petasites hyperboreus - Arctic Sweet Coltsfoot
Petasites japonicus - Sweet Coltsfoot
Petasites palmatus - Sweet Butterbur
Petasites saggitatus - Arrowleaf Sweet Coltsfoot
Podophyllum hexandrum - Himalayan May Apple
Podophyllum peltatum - American Mandrake
Polygonatum biflorum - Small Solomon's Seal
Polygonatum commutatum - King Solomon's Seal
Polygonatum multiflorum - Solomon's Seal
Polygonatum odoratum - Solomon's Seal
Polygonatum pubescens - Hairy Solomon's Seal
Polygonatum sibiricum - Huang Jing
Polygonatum verticillatum - Whorled Solomon's Seal
Primula elatior - Oxlip
Pulmonaria officinalis - Lungwort
Pulmonaria saccharata - Jerusalem Sage
Pyrola minor - Wintergreen
Sedum telephium - Orpine
Smilacena racemosa - False Spikenard
Smilacena stellata - Star-Flowered Lily Of The Valley
Sparganium erectum - Bur Reed
Streptopus amplexifolius - Wild Cucumber
Streptopus roseus - Scootberry
Tolmiea menziesii - Youth On Age
Trillium erectum - Beth Root
Trillium grandiflorum - White Trillium
Trillium ovatum - Wakerobin
Trillium sessile - Toadshade
Trillium undulatum - Painted Trillium
Uvularia perfoliata - Bellwort
Uvularia sessilifolia - Bellwort
Viola labradorica - Labrador Violet

Comments

Thursday, July 10, 2008

I picked all of the beets that were big enough to can, and it sure seemed like I had a lot. But after I got them all packed into jars, I realized that I only had 2 quarts. There are still more to pick, but they're still small yet. I think I posted directions for pickling beets before (1 part sugar to 1 part vinegar with cinnamon to taste), but I actually canned this batch. Leave a 1/2" of headspace to allow for expansion and process in a water bath canner for 30 minutes. I kept mine whole (just like my grandparents used to), except for the few that were just too big to can whole.

I also trimmed up my rosemary plant today. It was a Christmas gift, and it's been growing nicely in a pot in my windowsill. I'm hoping the trimming will encourage new growth, but the pot might simply be restricting the roots too much (it will obviously never get as big as it could outside in the ground as long as it stays in the pot). I might have to transplant it soon.

Artichokes were getting out of hand at the farm, and nobody was eating them. I decided to make an artichoke pesto. I had over 20 artichokes, but most of them were small. They were starting to open up, and once they bloom they're not much good for eating. I boiled the artichokes for 40 minutes in two batches and then put the artichoke hearts in a blender with the rosemary I'd trimmed off, about 10 cloves of garlic, some lemon juice, a bit of sea salt, a good helping of of olive oil, and almonds (the only nuts I had on hand). It smells and tastes great (the bit I sampled at least). I had a great artichoke pesto with sun-dried tomatoes at Veganopolis, in Portland... and I really wish I had sun-dried tomatoes for mine. It's still good though, and I'm looking forward to having some on pasta or a sandwhich/wrap. Tonight's dinner was artichoke petals, and more than I knew what to do with.

I think I mentioned that I was going to be doing (or, at least see about doing) some gardening out at my grandfather's house. I used Google Earth to estimate that the gardening area is between 7 and 8,000 sq. ft. The sprinkler I'm planning on getting has a range of just under 4,000 sq. ft. at the maximum PSI. And oscillating sprinklers have the best range, though at the expense of watering efficiency. The biggest problems with oscillating sprinklers is that the water can be carried away by the wind because it's being spraying higher in the air than with other types of sprinklers, and for the same reason, more of it is likely to be evaporated. Watering early in the morning should help me alleviate both of these problems.

As best as I can tell, the 4,000 sq. ft. that this sprinkler will cover is already larger than the area that my grandfather used to plant in, so it sounds like a good start to me. And, I won't be out at my grandfather's house daily, so I need something that will cover a large area without needing to be moved around (or without the need to purchase more than one). With an automatic timer I can set the sprinkler to run every morning, whether I'm there or not. That way I know my plants are getting the water they need. Outside of this 4,000 sq. ft. area I'll plant drought resistant plants, or plants with lower watering requirements... probably perennials like fruit trees (although, fruit trees will require more water during the first year or two as they get established).

This is all theoretical of course, especially since I don't really have a way to get to my grandfather's without catching a ride. He's way out in the country, I don't drive, and I'm currently bike-less. But these are only minor obstacles. I should have a clover crop sown in August, and I'll till it in in the spring and get started on planting a real garden.

Comments

Wednesday, July 09, 2008

I've been really excited about espalier fruit trees ever since I read about them in John Seymour's The Self-sufficient Life and How to Live It. My interest was renewed when I was sitting at the farmers' market today next to a guy that was selling apple trees, among other things. I'm thinking about putting down a cover crop at my grandfather's place to start getting the soil ready for next season, since the soil is in really bad shape. Planting some fruit trees while I'm at it doesn't sound like a bad plan either.
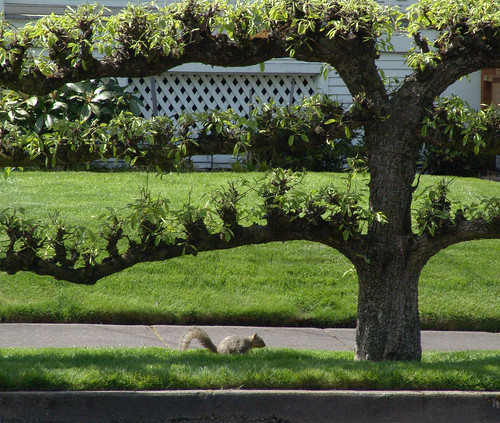
(Photo by sillydog)

I don't have any experience with espaliering fruit trees, and reading really doesn't cut for some of the more visual gardening practices. Fortunately, I found this great video that takes you through the process step-by-step. The guy's a little goofy, but it's a well-made video. Hope you enjoy it as much as I did.


Comments

Monday, June 30, 2008

I've been working out at the university's farm for over a month now, and things are starting to come along. Since I'm getting back into the swing of things, I thought I'd share what I've been up to.

The window garden has taken on a new look this season. The new apartment isn't as Topsy Turvy friendly as the old dorm room, so I'm sticking with just the window boxes this time. I have loose-leaf lettuce growing in one of my four boxes and I pick it off as I need it for tacos, sandwiches, wraps, and burgers. I've had one basil plant going for a few months now, and it's been producing more basil than I can use. Ignoring that fact--and anticipating a good tomato harvest--I planted my remaining window boxes with basil. I hope to make lots of pasta sauce this year since pasta is probably the number one staple of this college student.

That means I'll be canning! Since I get all of the free produce I can stand from the farm where I work (and since so much of it went to waste last year because no one used it), I've been getting really excited about preserving the stuff that I harvest.

First, the research. Even though we helped our grandparents can vegetables every summer, I hadn't paid much attention to the details. We canned lots of pickles (both beet and cucumber), but it turns out that canning and pickling are two separate things. Who knew? Pickling typically uses salt and vinegar to preserve food. Canning heats the food in question and seals the jar that contains it. The things that I've read say that pickling will preserve your food for "several weeks" (and that's the best estimate I've seen so far). I go to CanningUSA.com for canning recipes and instructions, and they suggest using your canned food within a year to keep it from losing its nutritional value.

Additionally, I've found more than one way to pickle. You can drench your cucumbers in vinegar and various spices as I grew up doing, or you can pickle them in a more traditional sense by leaving them to ferment in a jar. People refer to these as "live" or "living" pickles. I stocked up on cucumbers at the cafeteria's salad bar and used Lynn's Favorite Fermented Pickles recipe as the basis for my own concoction. I didn't have the pepper flakes or the green onion so I just omitted them. I also guessed on the number of cucumbers I had since they were already sliced. I love garlic, so I added way more than the recipe called for. End result: I overestimated the amount of cucumber I had so these turned out a little saltier than I would have preferred. And did I mention that I went overboard on the garlic? It was a bit much, even for a garlic-lover like me. After just one slice you could have cleared a room of an army of vampires. They were still edible though, so I finished them off one-by-one. The next time I try these I'll make sure I'm using the proper proportions of ingredients.

Since then I've pickled beets, for which I found no recipe for living pickles. I roasted the beets at 400 degrees in the oven in about a 1/2 " of water for an hour or so (trim off all but an inch of the greens, but leave the ends otherwise intact). After you pull them out and they have a chance to cool, cut off the ends and peel off the skins. I actually sliced the beets 1/8-1/4" thick and then peeled the skins off and found that this was much easier. This is very messy and beet juice will stain like mad. Wear clothes you're willing to sacrifice! Pickle recipes I've seen haven't been as anal about sterilizing jars as canning recipes, so I grabbed an old pickle jar (the big ones you buy whole pickles in at the store) and packed the beet slices in. In a sauce pan I heated three cups of sugar and three cups of vinegar until the sugar melted and then stirred in cinamon to taste. Add this to the jar of beets until they're covered. The directions say to let them sit a few days, but that didn't keep me from getting into them the next day. Try to limit yourself to about 4 or 5 slices a day otherwise your bodily wastes will be dyed a purplish-red. This isn't any cause for alarm as far as I know, I just find it unnerving to have strangely colored fluids coming out of me.

That's it for now. I've done a little other preserving, but I haven't canned anything yet. I did, however, pick up jars, a water bath canner, and all of the necessary accessories when I picked up vinegar for the beets. The next batch of beets I pick will probably be canned whole or in quarters, and I'm looking forward to all of those tomatoes.

More next time.

Comments

Wednesday, January 23, 2008

These days, people seem to be squeamish about human wastes. I won't lie and say that I'm not one of them (I was raised that way after all)... but I do understand the importance of putting back whatever we take from the earth. Enter the composting toilet.

As the name implies, the purpose of a composting toilet is to compost human wastes, or humanure. "Ewww" might be the first response, but animal wastes are a common garden fertilizer, and human waste is no different. Since I won't have any animals, it's human waste or no waste for me.

John Seymour explains the logic of the composting toilet (he calls it a dry toilet, and his specific design is the Thunderbox loo) in The Self-sufficient Life and How to Live It. Flush toilets are expensive, and not only waste water with each flush, but add pollutants to otherwise drinkable water. The nutrients in humanure are a necessary component in maintaining soil fertility, but with the simple push of a lever it's out of sight and out of mind.

I really wish you could see the picture that John included in his book. My description just won't do it any justice. A small building or room is built with a space left underneath for the collection of waste.Two holes are cut in the floor, and the actual toilet sits on one hole at a time. After the first hole is filled, the toilet is moved to the second hole and the first is left to compost. Ventilation pipes take gases and smells away from the composting compartment. After each person takes care of business, they just add a cupful of sawdust or other such material to keep the consistency just right.

I've actually had the pleasure of using one of the Self-contained Sun-Mar composting toilets this summer when I worked out on the farm. Contrary to what you might think, it's actually very clean, easy to use, and free of odor. You can also get toilets that look like normal toilets and have a compartment under the floor for catching the wastes, whereas the Sun-Mar toilet I linked to does the actual composting itself.

To go along with all of this info is a story I heard on the topic. I don't know if it's myth or reality, but supposedly Japanese farmers put a lot of effort into creating very ornate and very beautiful outhouses that they would place out by the road. Human waste was such a valuable resource to the farmers that they wanted to attract anyone that was traveling by to come leave precious fertilizer that they could use on their farm. Crazy? Even if it is, it still makes perfect sense from the point of view of a self-supporter.

Comments

Friday, January 18, 2008

DID YOU KNOW? This is by far the most popular page on Going backward, moving forward. If you like this, my post on indoor composting might also be helpful.

Felknor Ventures 82506 Topsy Turvy Upside-Down Tomato PlanterOne cool product that I've had the pleasure of using is the Topsy Turvy Upside-Down Tomato Planter. It's kind of an experimental product as is, and I was using it in an even more experimental way. I got the Topsy Turvy so that I could utilize the vertical space in my indoor container garden. Not being able to grow a garden would have been the bane of my college dorm room existence... but I wasn't about to let someone tell me that I couldn't do it.

I had a couple of things going for me. First, I had a south facing window, which means I had sunlight for the greater part of the day (although, the inconvenient placing of a tree stole part of it from me). Second, I had very wide windows.

I couldn't just hang my Topsy Turvy planters in any old way, since I was renting the dorm room and would have to pay for any damages. What I did was, I got a wooden dowel from the local lumber yard, and Adjustable Shower Rod End Flanges from the local hardware store (these have rubber ends, and you twist them to add more tension, and thus secure the wooden dowel in the window sill). The link for the flanges is just an example, they actually only cost me $2-3 at the hardware store. I then cut the dowel to size -- the saw on my pocket knife, no less--according to the directions that came with the flanges, and then secured it in place. I drilled a large hole through a board and placed it in the middle of the dowel to add extra support for the planters, as they can be quite heavy.


With the Topsy Turvy you either have to get plants that are already started, or start them yourself. You cannot grow from seed inside the planter. Add some soil to the planter, shake most of the dirt off of the plants roots, and insert the plant according to the instructions that come with the planter. Soil will settle after you water it, so be sure to add more than you think you need (or add it after you hang the planter).

Here's a shot of my freshly planted garden, which includes my tomato and cucumber plants inside the Topsy Turvies (they're not just for tomatoes after all), and then green onions, lettuce, radishes, and Parisian Market carrots (which grow round like radishes rather than long like typical carrots) in window boxes. My tomato and cucumber are both early season varieties so that they don't require as long (or as much sun) to mature and they're also compact varieties that have been developed to grow in containers in tight spaces.


And a few from later in the season when growth had really taken off (it's not the best photo in the world, but you can sort of see some of the small cucumbers in the second photo):


Unfortunately, this was my first attempt at container gardening, and it was indoors to boot. I was guilty of both over and underwatering my plants. I did combat this some with the Topsy Turvy by cutting the top off of a gallon jug, and then cutting small holes into the bottom which I stuffed with bits of paper towel. I could then just keep the jug filled up and it would slowly wick water into the planter (this also kept water from dripping all over my window sill, since it didn't land in the window boxes as much as I would have liked).

On top of the watering issues, the tomato just wouldn't put on very impressive fruit. Got quite a few blooms, but there was either a lack of sun, a lack of fertilizer, or both. That didn't surprise me though. We had an unusually cool and cloudy summer, so even outdoor tomatoes struggled.

Ultimately, what killed my Topsy Turvy plants was the fact that I had to move during the growing season. Because the plants grow out of the bottom of the planter, they're very difficult to move over long distances... especially if you have no way to hang them up once you get where you're going. The plants were severely damaged in the moving process and never recovered. I'm eager to try again this year though, because I should be able to stay in one place throughout the growing season. After all, my indoor veggie garden wasn't a total failure:


DID YOU KNOW? This is by far the most popular page on Going backward, moving forward. If you like this, my post on indoor composting might also be helpful.

Comments